
Finding your suitable readers for prosthetic appliance kit is not easy. You may need consider between hundred or thousand products from many store. In this article, we make a short list of the best readers for prosthetic appliance kit including detail information and customer reviews. Let’s find out which is your favorite one.
908 reviews analysed


1. Halloween FX Slashed Eye Prosthetic
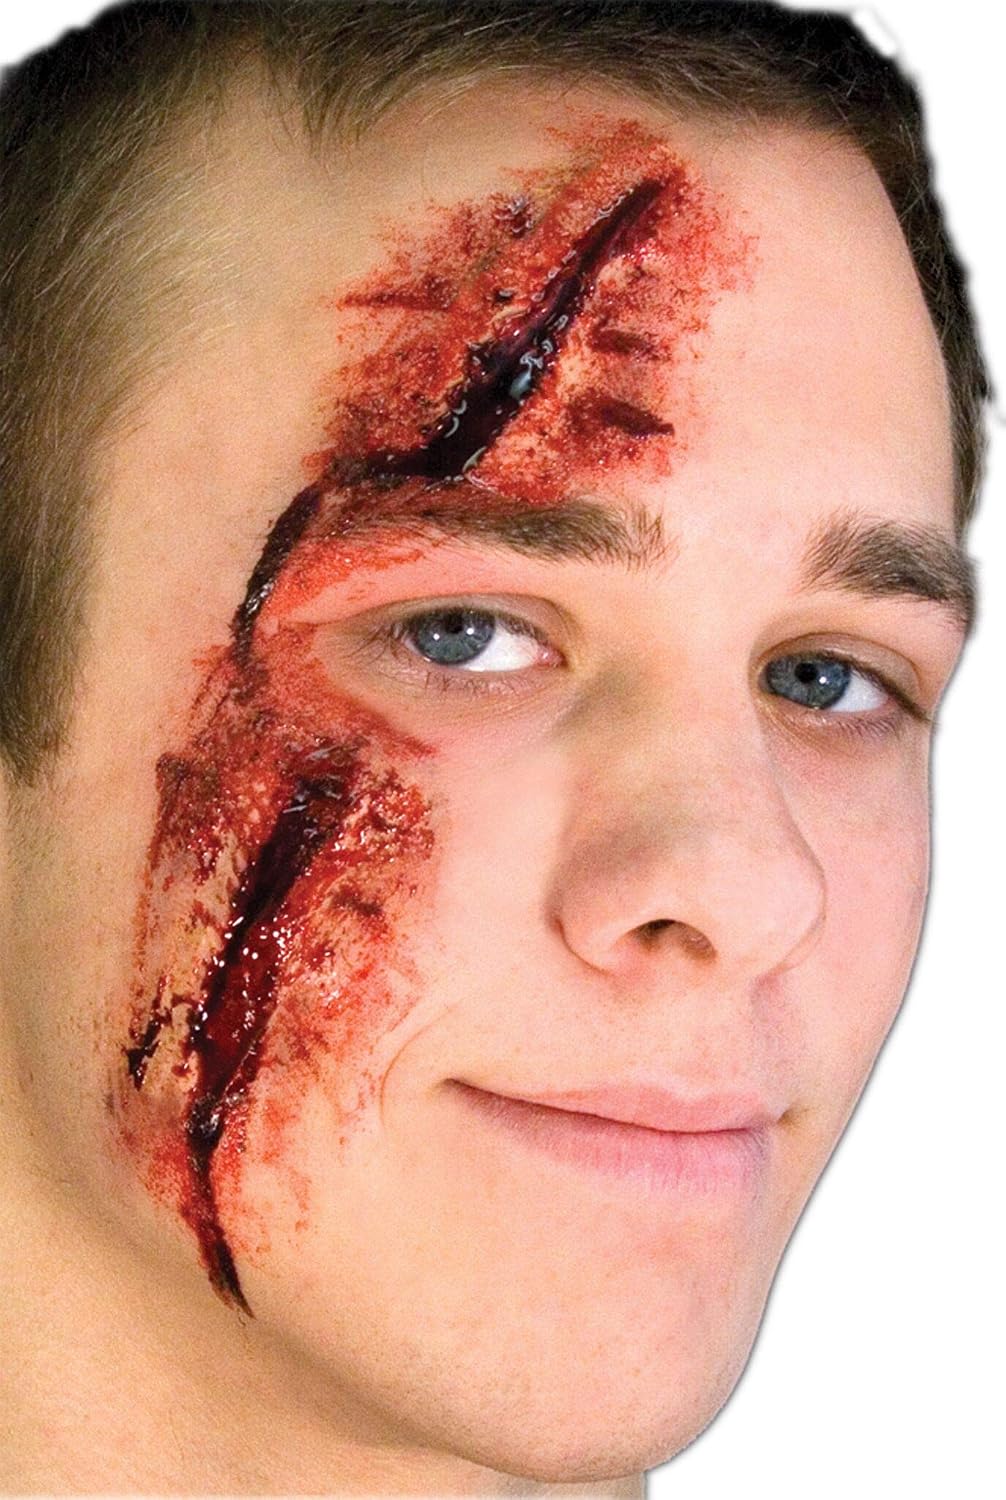
Description
Two-piece latex prosthetic with traditional ‘Woochie” feathered edge. Simply apply with spirit gum or latex, apply your own makeup and blood for the most grizzly look possible.
2. Forensic FX Simple Surface Scratches Kit, Pre-Colored Silicone Prosthetic Appliance, Cotton Swabs and 1oz Pros-Aide Adhesive, Special Effects Makeup for Halloween and Theater

Feature
- Realistic, pre-painted, fake bloody wound.
- Encapsulated silicone prosthetic
- Box contents: single use Simple Surface Scratches silicone prosthetic (approximate dimensions: 5in x 3in) + 1oz Pros-Aide adhesive + 5 cotton swabs
- For various occasions: for Halloween parties, cosplay or theatrical special effects.
- All prosthetic pieces are made with Platsil Gel 10 Silcione, silicone pigments, Baldiez (Cap Plastic), and flocking powders.
Description
APPLICATION PROCESS OF SILICONE PROSTHETIC
Materials needed:
- Adhesive: Pros-Aide
- Dissolving Agents: 100% pure acetone (preferred), or 99% isopropyl alcohol
- Tools: Cotton swabs, small tip paint brush, and small measuring cup
Please select the kit option if you would like to purchase the prosthetic + Pros-Aide and cotton swabs.
Steps:
- Pour ~10ml (~0.3oz) of pure acetone (preferred) or isopropyl alcohol into a small measuring cup.
- Get silicone prosthetic ready for skin placement.
- Get cotton swab (x1) ready as well as Pros-Aide.
- Dip cotton bud into Pros-Aide and spread adhesive over skin area where you will place prosthetic.
- Make sure the whole area is covered, and use some adhesive also on the prosthetic itself.
- Make sure the adhesive is tacky, or with some adhesives, make sure it has gone from white to clear.
- Glue the silicone prosthetic piece onto the skin, making sure all areas of the piece are glued down.
- Wait 5 minutes for glue and silicone piece to dry.
- The encapsulated area (check photo), needs to be dissolved with pure acetone or isopropyl alcohol.
- Use paint brush or another cotton swab and dip it into acetone or isopropyl alcohol and slowly dissolve the edges.
- Repeat this step the whole way through the silicone prosthetic edge until the ‘flashing edge’ (check photo) is peeled off.
- Use acetone to clean up the edges until your edges are smooth.
- Apply setting powder over the prosthetic and surrounding skin to set the prosthetic, reduce shine, and absorb excess moisture.
- Add blood, pus or additional colors as needed.
3. Forensic FX Deep Neck Wound Kit, Pre-Colored Silicone Prosthetic Appliance, Cotton Swabs and 1oz Pros-Aide Adhesive, Special Effects Makeup for Halloween and Theater

Feature
- Realistic, pre-painted, fake bloody wound.
- Encapsulated silicone prosthetic
- Box contents: single use Deep Neck Wound silicone prosthetic (approximate dimensions: 6.25in x 3in) + 1oz Pros-Aide adhesive + 5 cotton swabs
- For various occasions: for Halloween parties, cosplay or theatrical special effects.
- All prosthetic pieces are made with Platsil Gel 10 Silcione, silicone pigments, Baldiez (Cap Plastic), and flocking powders.
Description
APPLICATION PROCESS OF SILICONE PROSTHETIC
Materials needed:
- Adhesive: Pros-Aide
- Dissolving Agents: 100% pure acetone (preferred), or 99% isopropyl alcohol
- Tools: Cotton swabs, small tip paint brush, and small measuring cup
Please select the kit option if you would like to purchase the prosthetic + Pros-Aide and cotton swabs.
Steps:
- Pour ~10ml (~0.3oz) of pure acetone (preferred) or isopropyl alcohol into a small measuring cup.
- Get silicone prosthetic ready for skin placement.
- Get cotton swab (x1) ready as well as Pros-Aide.
- Dip cotton bud into Pros-Aide and spread adhesive over skin area where you will place prosthetic.
- Make sure the whole area is covered, and use some adhesive also on the prosthetic itself.
- Make sure the adhesive is tacky, or with some adhesives, make sure it has gone from white to clear.
- Glue the silicone prosthetic piece onto the skin, making sure all areas of the piece are glued down.
- Wait 5 minutes for glue and silicone piece to dry.
- The encapsulated area (check photo), needs to be dissolved with pure acetone or isopropyl alcohol.
- Use paint brush or another cotton swab and dip it into acetone or isopropyl alcohol and slowly dissolve the edges.
- Repeat this step the whole way through the silicone prosthetic edge until the ‘flashing edge’ (check photo) is peeled off.
- Use acetone to clean up the edges until your edges are smooth.
- Apply setting powder over the prosthetic and surrounding skin to set the prosthetic, reduce shine, and absorb excess moisture.
- Add blood, pus or additional colors as needed.
4. Forensic FX Deep Ankle Wound Kit, Pre-Colored Silicone Prosthetic Appliance, Cotton Swabs and 1oz Pros-Aide Adhesive, Special Effects Makeup for Halloween and Theater

Feature
- Realistic, pre-painted, fake bloody wound.
- Encapsulated silicone prosthetic
- Box contents: single use Deep Ankle Wound silicone prosthetic (approximate dimensions: 6.75in x 5.25in) + 1oz Pros-Aide adhesive + 5 cotton swabs
- For various occasions: for Halloween parties, cosplay or theatrical special effects.
- All prosthetic pieces are made with Platsil Gel 10 Silcione, silicone pigments, Baldiez (Cap Plastic), and flocking powders.
Description
APPLICATION PROCESS OF SILICONE PROSTHETIC
Materials needed:
- Adhesive: Pros-Aide
- Dissolving Agents: 100% pure acetone (preferred), or 99% isopropyl alcohol
- Tools: Cotton swabs, small tip paint brush, and small measuring cup
Please select the kit option if you would like to purchase the prosthetic + Pros-Aide and cotton swabs.
Steps:
- Pour ~10ml (~0.3oz) of pure acetone (preferred) or isopropyl alcohol into a small measuring cup.
- Get silicone prosthetic ready for skin placement.
- Get cotton swab (x1) ready as well as Pros-Aide.
- Dip cotton bud into Pros-Aide and spread adhesive over skin area where you will place prosthetic.
- Make sure the whole area is covered, and use some adhesive also on the prosthetic itself.
- Make sure the adhesive is tacky, or with some adhesives, make sure it has gone from white to clear.
- Glue the silicone prosthetic piece onto the skin, making sure all areas of the piece are glued down.
- Wait 5 minutes for glue and silicone piece to dry.
- The encapsulated area (check photo), needs to be dissolved with pure acetone or isopropyl alcohol.
- Use paint brush or another cotton swab and dip it into acetone or isopropyl alcohol and slowly dissolve the edges.
- Repeat this step the whole way through the silicone prosthetic edge until the ‘flashing edge’ (check photo) is peeled off.
- Use acetone to clean up the edges until your edges are smooth.
- Apply setting powder over the prosthetic and surrounding skin to set the prosthetic, reduce shine, and absorb excess moisture.
- Add blood, pus or additional colors as needed.
5. Forensic FX Cheek Laceration Kit, Pre-Colored Silicone Prosthetic Appliance, Cotton Swabs and 1oz Pros-Aide Adhesive, Special Effects Makeup for Halloween and Theater

Feature
- Realistic, pre-painted, fake bloody wound.
- Encapsulated silicone prosthetic
- Box contents: single use Cheek Laceration silicone prosthetic (approximate dimensions: 3.25in x 2.5in) + 1oz Pros-Aide adhesive + 5 cotton swabs
- For various occasions: for Halloween parties, cosplay or theatrical special effects.
- All prosthetic pieces are made with Platsil Gel 10 Silcione, silicone pigments, Baldiez (Cap Plastic), and flocking powders.
Description
APPLICATION PROCESS OF SILICONE PROSTHETIC
Materials needed:
- Adhesive: Pros-Aide
- Dissolving Agents: 100% pure acetone (preferred), or 99% isopropyl alcohol
- Tools: Cotton swabs, small tip paint brush, and small measuring cup
Please select the kit option if you would like to purchase the prosthetic + Pros-Aide and cotton swabs.
Steps:
- Pour ~10ml (~0.3oz) of pure acetone (preferred) or isopropyl alcohol into a small measuring cup.
- Get silicone prosthetic ready for skin placement.
- Get cotton swab (x1) ready as well as Pros-Aide.
- Dip cotton bud into Pros-Aide and spread adhesive over skin area where you will place prosthetic.
- Make sure the whole area is covered, and use some adhesive also on the prosthetic itself.
- Make sure the adhesive is tacky, or with some adhesives, make sure it has gone from white to clear.
- Glue the silicone prosthetic piece onto the skin, making sure all areas of the piece are glued down.
- Wait 5 minutes for glue and silicone piece to dry.
- The encapsulated area (check photo), needs to be dissolved with pure acetone or isopropyl alcohol.
- Use paint brush or another cotton swab and dip it into acetone or isopropyl alcohol and slowly dissolve the edges.
- Repeat this step the whole way through the silicone prosthetic edge until the ‘flashing edge’ (check photo) is peeled off.
- Use acetone to clean up the edges until your edges are smooth.
- Apply setting powder over the prosthetic and surrounding skin to set the prosthetic, reduce shine, and absorb excess moisture.
- Add blood, pus or additional colors as needed.
6. Forensic FX Opened Stitches Kit, Pre-Colored Silicone Prosthetic Appliance, Cotton Swabs and 1oz Pros-Aide Adhesive, Special Effects Makeup for Halloween and Theater

Feature
- Realistic, pre-painted, fake bloody wound.
- Encapsulated silicone prosthetic
- Box contents: single use Opened Stitches silicone prosthetic (approximate dimensions: 5in x 2.5in) + 1oz Pros-Aide adhesive + 5 cotton swabs
- For various occasions: for Halloween parties, cosplay or theatrical special effects.
- All prosthetic pieces are made with Platsil Gel 10 Silcione, silicone pigments, Baldiez (Cap Plastic), and flocking powders.
Description
APPLICATION PROCESS OF SILICONE PROSTHETIC
Materials needed:
- Adhesive: Pros-Aide
- Dissolving Agents: 100% pure acetone (preferred), or 99% isopropyl alcohol
- Tools: Cotton swabs, small tip paint brush, and small measuring cup
Please select the kit option if you would like to purchase the prosthetic + Pros-Aide and cotton swabs.
Steps:
- Pour ~10ml (~0.3oz) of pure acetone (preferred) or isopropyl alcohol into a small measuring cup.
- Get silicone prosthetic ready for skin placement.
- Get cotton swab (x1) ready as well as Pros-Aide.
- Dip cotton bud into Pros-Aide and spread adhesive over skin area where you will place prosthetic.
- Make sure the whole area is covered, and use some adhesive also on the prosthetic itself.
- Make sure the adhesive is tacky, or with some adhesives, make sure it has gone from white to clear.
- Glue the silicone prosthetic piece onto the skin, making sure all areas of the piece are glued down.
- Wait 5 minutes for glue and silicone piece to dry.
- The encapsulated area (check photo), needs to be dissolved with pure acetone or isopropyl alcohol.
- Use paint brush or another cotton swab and dip it into acetone or isopropyl alcohol and slowly dissolve the edges.
- Repeat this step the whole way through the silicone prosthetic edge until the ‘flashing edge’ (check photo) is peeled off.
- Use acetone to clean up the edges until your edges are smooth.
- Apply setting powder over the prosthetic and surrounding skin to set the prosthetic, reduce shine, and absorb excess moisture.
- Add blood, pus or additional colors as needed.
7. Forensic FX Surface Infection + Synthetic Pus Kit, Pre-Colored Silicone Prosthetic Appliance, Cotton Swabs and 1oz Pros-Aide Adhesive, Special Effects Makeup for Halloween and Theater

Feature
- Realistic, pre-painted, fake bloody wound.
- Encapsulated silicone prosthetic
- Box contents: single use Surface Infection silicone prosthetic (approximate dimensions: 4.75in x 4.5in) + synthetic pus 8ml + 1oz Pros-Aide adhesive + 5 cotton swabs
- For various occasions: for Halloween parties, cosplay or theatrical special effects.
- All prosthetic pieces are made with Platsil Gel 10 Silcione, silicone pigments, Baldiez (Cap Plastic), and flocking powders.
Description
APPLICATION PROCESS OF SILICONE PROSTHETIC
Materials needed:
- Adhesive: Pros-Aide
- Dissolving Agents: 100% pure acetone (preferred), or 99% isopropyl alcohol
- Tools: Cotton swabs, small tip paint brush, and small measuring cup
Please select the kit option if you would like to purchase the prosthetic + Pros-Aide and cotton swabs.
Steps:
- Pour ~10ml (~0.3oz) of pure acetone (preferred) or isopropyl alcohol into a small measuring cup.
- Get silicone prosthetic ready for skin placement.
- Get cotton swab (x1) ready as well as Pros-Aide.
- Dip cotton bud into Pros-Aide and spread adhesive over skin area where you will place prosthetic.
- Make sure the whole area is covered, and use some adhesive also on the prosthetic itself.
- Make sure the adhesive is tacky, or with some adhesives, make sure it has gone from white to clear.
- Glue the silicone prosthetic piece onto the skin, making sure all areas of the piece are glued down.
- Wait 5 minutes for glue and silicone piece to dry.
- The encapsulated area (check photo), needs to be dissolved with pure acetone or isopropyl alcohol.
- Use paint brush or another cotton swab and dip it into acetone or isopropyl alcohol and slowly dissolve the edges.
- Repeat this step the whole way through the silicone prosthetic edge until the ‘flashing edge’ (check photo) is peeled off.
- Use acetone to clean up the edges until your edges are smooth.
- Apply setting powder over the prosthetic and surrounding skin to set the prosthetic, reduce shine, and absorb excess moisture.
- Add blood, pus or additional colors as needed.
8. Forensic FX Arm Lacerations Kit, Pre-Colored Silicone Prosthetic Appliance, Cotton Swabs and 1oz Pros-Aide Adhesive, Special Effects Makeup for Halloween and Theater

Feature
- Realistic, pre-painted, fake bloody wound.
- Encapsulated silicone prosthetic
- Box contents: single use Arm Lacerations silicone prosthetic (approximate dimensions: 5.5in x 3.5in) + 1oz Pros-Aide adhesive + 5 cotton swabs
- For various occasions: for Halloween parties, cosplay or theatrical special effects.
- All prosthetic pieces are made with Platsil Gel 10 Silcione, silicone pigments, Baldiez (Cap Plastic), and flocking powders.
Description
APPLICATION PROCESS OF SILICONE PROSTHETIC
Materials needed:
- Adhesive: Pros-Aide
- Dissolving Agents: 100% pure acetone (preferred), or 99% isopropyl alcohol
- Tools: Cotton swabs, small tip paint brush, and small measuring cup
Please select the kit option if you would like to purchase the prosthetic + Pros-Aide and cotton swabs.
Steps:
- Pour ~10ml (~0.3oz) of pure acetone (preferred) or isopropyl alcohol into a small measuring cup.
- Get silicone prosthetic ready for skin placement.
- Get cotton swab (x1) ready as well as Pros-Aide.
- Dip cotton bud into Pros-Aide and spread adhesive over skin area where you will place prosthetic.
- Make sure the whole area is covered, and use some adhesive also on the prosthetic itself.
- Make sure the adhesive is tacky, or with some adhesives, make sure it has gone from white to clear.
- Glue the silicone prosthetic piece onto the skin, making sure all areas of the piece are glued down.
- Wait 5 minutes for glue and silicone piece to dry.
- The encapsulated area (check photo), needs to be dissolved with pure acetone or isopropyl alcohol.
- Use paint brush or another cotton swab and dip it into acetone or isopropyl alcohol and slowly dissolve the edges.
- Repeat this step the whole way through the silicone prosthetic edge until the ‘flashing edge’ (check photo) is peeled off.
- Use acetone to clean up the edges until your edges are smooth.
- Apply setting powder over the prosthetic and surrounding skin to set the prosthetic, reduce shine, and absorb excess moisture.
- Add blood, pus or additional colors as needed.
9. Forensic FX Deep Abdominal Wound Kit, Pre-Colored Silicone Prosthetic Appliance, Cotton Swabs and 1oz Pros-Aide Adhesive, Special Effects Makeup for Halloween and Theater

Feature
- Realistic, pre-painted, fake bloody wound.
- Encapsulated silicone prosthetic
- Box contents: single use Deep Abdominal Wound silicone prosthetic (approximate dimensions: 5.5in x 4.75in) + 1oz Pros-Aide adhesive + 5 cotton swabs
- For various occasions: for Halloween parties, cosplay or theatrical special effects.
- All prosthetic pieces are made with Platsil Gel 10 Silcione, silicone pigments, Baldiez (Cap Plastic), and flocking powders.
Description
APPLICATION PROCESS OF SILICONE PROSTHETIC
Materials needed:
- Adhesive: Pros-Aide
- Dissolving Agents: 100% pure acetone (preferred), or 99% isopropyl alcohol
- Tools: Cotton swabs, small tip paint brush, and small measuring cup
Please select the kit option if you would like to purchase the prosthetic + Pros-Aide and cotton swabs.
Steps:
- Pour ~10ml (~0.3oz) of pure acetone (preferred) or isopropyl alcohol into a small measuring cup.
- Get silicone prosthetic ready for skin placement.
- Get cotton swab (x1) ready as well as Pros-Aide.
- Dip cotton bud into Pros-Aide and spread adhesive over skin area where you will place prosthetic.
- Make sure the whole area is covered, and use some adhesive also on the prosthetic itself.
- Make sure the adhesive is tacky, or with some adhesives, make sure it has gone from white to clear.
- Glue the silicone prosthetic piece onto the skin, making sure all areas of the piece are glued down.
- Wait 5 minutes for glue and silicone piece to dry.
- The encapsulated area (check photo), needs to be dissolved with pure acetone or isopropyl alcohol.
- Use paint brush or another cotton swab and dip it into acetone or isopropyl alcohol and slowly dissolve the edges.
- Repeat this step the whole way through the silicone prosthetic edge until the ‘flashing edge’ (check photo) is peeled off.
- Use acetone to clean up the edges until your edges are smooth.
- Apply setting powder over the prosthetic and surrounding skin to set the prosthetic, reduce shine, and absorb excess moisture.
- Add blood, pus or additional colors as needed.
10. Forensic FX Slashed Neck Kit, Pre-Colored Silicone Prosthetic Appliance, Cotton Swabs and 1oz Pros-Aide Adhesive, Special Effects Makeup for Halloween and Theater

Feature
- Realistic, pre-painted, fake bloody wound.
- Encapsulated silicone prosthetic
- Box contents: single use Slashed Neck silicone prosthetic (approximate dimensions: 7.5in x 4in) + 1oz Pros-Aide adhesive + 5 cotton swabs
- For various occasions: for Halloween parties, cosplay or theatrical special effects.
- All prosthetic pieces are made with Platsil Gel 10 Silcione, silicone pigments, Baldiez (Cap Plastic), and flocking powders.
Description
APPLICATION PROCESS OF SILICONE PROSTHETIC
Materials needed:
- Adhesive: Pros-Aide
- Dissolving Agents: 100% pure acetone (preferred), or 99% isopropyl alcohol
- Tools: Cotton swabs, small tip paint brush, and small measuring cup
Please select the kit option if you would like to purchase the prosthetic + Pros-Aide and cotton swabs.
Steps:
- Pour ~10ml (~0.3oz) of pure acetone (preferred) or isopropyl alcohol into a small measuring cup.
- Get silicone prosthetic ready for skin placement.
- Get cotton swab (x1) ready as well as Pros-Aide.
- Dip cotton bud into Pros-Aide and spread adhesive over skin area where you will place prosthetic.
- Make sure the whole area is covered, and use some adhesive also on the prosthetic itself.
- Make sure the adhesive is tacky, or with some adhesives, make sure it has gone from white to clear.
- Glue the silicone prosthetic piece onto the skin, making sure all areas of the piece are glued down.
- Wait 5 minutes for glue and silicone piece to dry.
- The encapsulated area (check photo), needs to be dissolved with pure acetone or isopropyl alcohol.
- Use paint brush or another cotton swab and dip it into acetone or isopropyl alcohol and slowly dissolve the edges.
- Repeat this step the whole way through the silicone prosthetic edge until the ‘flashing edge’ (check photo) is peeled off.
- Use acetone to clean up the edges until your edges are smooth.
- Apply setting powder over the prosthetic and surrounding skin to set the prosthetic, reduce shine, and absorb excess moisture.
- Add blood, pus or additional colors as needed.
Conclusion
By our suggestions above, we hope that you can found Prosthetic Appliance Kit for you.Please don’t forget to share your experience by comment in this post. Thank you!